Overview
Video transitions are used to provide a smooth “bridge” from one shot or scene to another. A common practice for people new to editing is to apply transitions to every edit. This is generally unnecessary and can eventually become distracting for the viewer. With most professionally edited video, fancy transitions are rarely used with the simple “cut” being the most popular edit.
Used carefully, transitions can be an effective and eye-catching technique that can add interest to an edit and increase or decrease the pace of an edit. Transitions can also be used to convey a change in location or time within your edit. The most common transition used within video production is the simple “dissolve” which provides a smooth fade between shots and scenes.
Sometimes, when you attempt to place one shot after another the change may not look fluid or smooth. This is known as a “jump-cut” and a dissolve or another transition is a good way to overcome this problem.
Location of Transitions
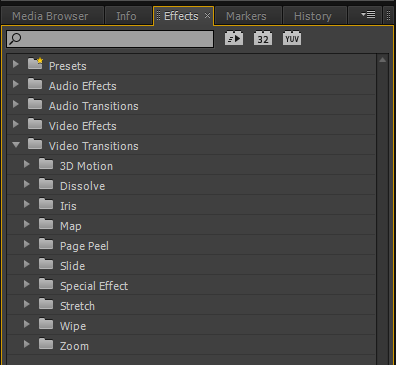
The video transitions available within Premiere CS6 may be found in the Effects Panel to the left of the Timeline, in the folder named Video Transitions. Twirl down the folder triangle to reveal them. They are organised by type in various folders.
Applying Single-Sided Transitions
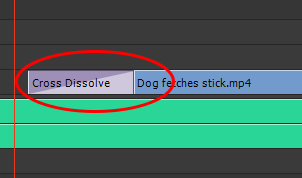
To apply a single-sided transition, simply select one and drag it onto either the start or end of a single clip in the timeline. Twirl down the Dissolve folder, select Cross Dissolve and add it to the start of a clip in the Timeline as we did in a previous lesson. This will give a nice fade from black into the clip. Another way to apply a transition is to right-click on the start of the clip and choose “Apply Default transition” as we did in the audio lesson previously.

Default Transitions
Every sequence created will have a Default Video Transition and a Default Audio Transition. The standard ones are Dissolve for video and Crossfade for audio. You may set any transition you choose to be your default transition for a sequence. Simply right-click on the transition in the effects panel and choose “Set as Default Transition“.
Each default transition will have a standard length i.e. the time it takes for the transition to complete. This may be altered in Premiere CS6 Preferences. Select Edit/Preferences/General to open the options box

Within the options window you may change the defaults in frames and seconds.

Applying Double-Sided Transitions
A double sided transition is a transition applied to the “join” of two adjacent clips. Let’s try adding a double sided dissolve to our first edit in the Timeline.

Play through the transition and you should see a smooth fade from one clip to another. Great, but for this to happen the adjacent clips must have “handles“
Handles & Edit points
When you drop an entire clip onto the timeline, it will have two small grey triangles in the top corners (unless you have set IN & OUT points within the Source Monitor previously). The current start and end of the clip are now it’s Edit Points within the Timeline

The triangles tells us that there are no more frames available before the triangle at the start of the clip, or after the triangle at the end of the clip. Drag the ends of the clip inwards slightly and you should notice that the triangles disappear.

You have just created two Handles. The handle at the start of the clip is known as the Head and the handle at the end of the clip is known as the Tail. The handles will be used to create the double-sided transition, either side of the edit points of the two clips. Obviously, the length of the handles will determine the available length of any applied transition.
Editing Transitions
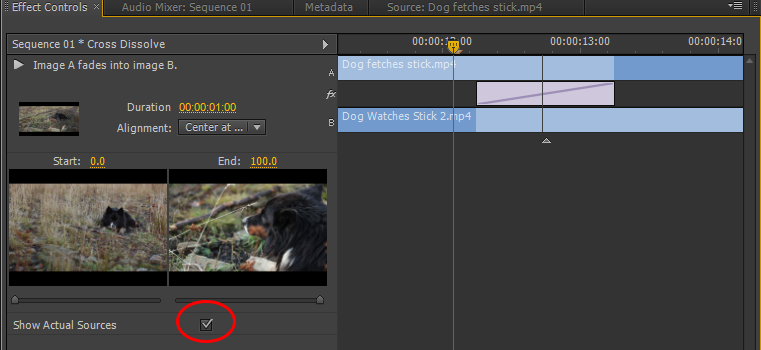
Click on the transition applied between our two clips and the transition parameters/details will appear in the Effect Controls panel. Click the “Show Actual Sources” tick box to display the video rather than the A/B representation of the transition.
We can see the transition is now represented by the mauve/pink rectangle between our two clips. The black line represents the edit point between the clips. Hover over the black line and the Rolling Edit tool will appear. With this you may alter the edit point within the transition, depending upon the clip handles mentioned earlier. Dragging left or right will alter the IN and OUT points of the clips and these will be displayed within the Program Monitor. Notice that the transition moves to accommodate the changes.

Hover over the transition rectangle either side of the black line and the Slide tool will appear. Now you may slide the position of the transition back and forth (dependent upon handle length) without altering the clip edit points or the length of the transition.

Duration & Alignment
In the Effect Controls, you adjust the duration of the transition and also it’s alignment. To alter the duration just type in a new timecode length (the orange numbers). To change the alignment, chose an option from the drop down box.
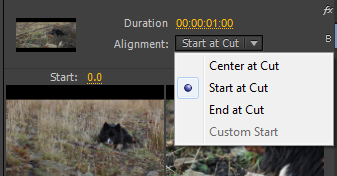
Transition Settings
Different transitions will have a variety of options available within the Effect Controls panel and we will cover these when required.
Applying Transitions to Multiple Clips
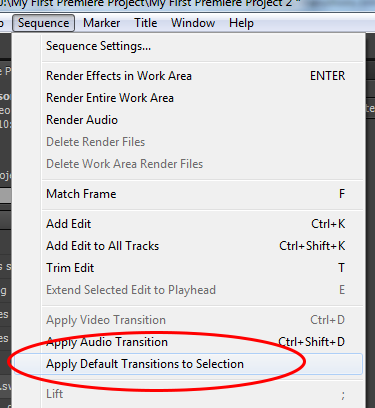
If you have several edits within your timeline and you would like to add the same transition to all edit points simply click and drag a box (marquee) around the clips in the timeline to select them. Then select Sequence from the main menu and then Apply Default Transition.

Rendering Transitions
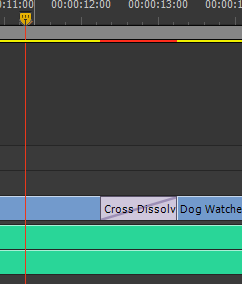
You may notice that when you apply a transition, a red line appears above the transition in the timeline. This means that Adobe Premiere CS6 needs to render the video frames to enable smooth playback. The process of rendering is Premiere/the computer making the appropriate calculations to display the video production in real time. If you have a CUDA enabled video card installed in your machine this may not happen.
To perform the render and change the line to yellow for real time playback, simply press Enter on your keyboard. Everything within the Work Area bar will then be rendered.
