Lesson 4B – Motion Keyframes
Keyframes or Keyframing is an integral part of using Adobe Premiere CS6. It can be confusing and frustrating at times but stick with it and practice as it is an technical skill well worth mastering. Most if not all effects within Premiere CS6 contain parameters that Keyframes may be applied to. Keyframes change the value of a parameter over time.
Exercise 1 – Slow Zoom
Let’s add a slow “zoom in” to our title background image. Select the “Sunset 1” clip in the Timeline.

It should appear in the Effect Controls Panel as shown below.

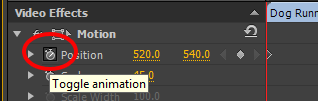
Click on the “stopwatch” icon next to the Scale parameter to toggle Keyframe Animation on/off. Notice that a Keyframe has been placed on the clip exactly where your playback head is positioned within the clip at that time:
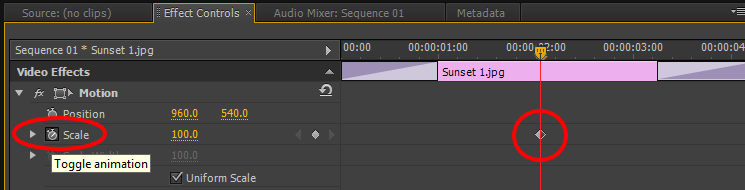
The diamond shaped keyframe that we have entered corresponds to the current Scale value, which is the full, default size of our video clip. Click on the Keyframe, drag it to the left and drop it on the first frame of our clip, Sunset 1.

Now we have basically told Premiere that we are going to animate our clip (by clicking on the stopwatch) and we have entered a starting point (the beginning of our clip) and a starting size (100).
We want our clip to grow in size over time. Let’s drag the Playhead to the middle of the clip and click the Add/Remove keyframe button to add our second Keyframe. Without moving the Playhead, adjust the Scale amount/value to 110.

Now drag the Playhead to the beginning of the clip and play through. You should notice the clip gradually growing over time (zooming in). Drag the second Keyframe to the end of the clip and play through to see the result.

Now that we have multiple keyframes you may select each one using the small triangles either side of the Add/Remove Keyframe button.


Always ensure that you select a keyframe in this manner before adjusting it’s value.
Exercise 2 – Picture in Picture
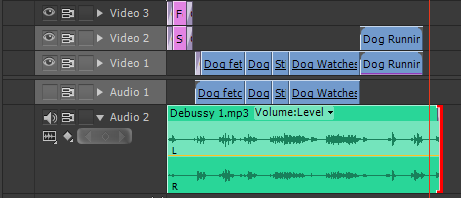
Picture in picture is a very popular effect that can be created using Motion. For this exercise we will be using the “Dog Running 1” clip within our Timeline. Drag two instances of the clip to the Timeline as shown below:
Next, right-click and select “Unlink” for both clips. Then delete the audio portion of each clip as we do not need it. Finally drag one clip on top of the other onto the next available video track which is Video 2.

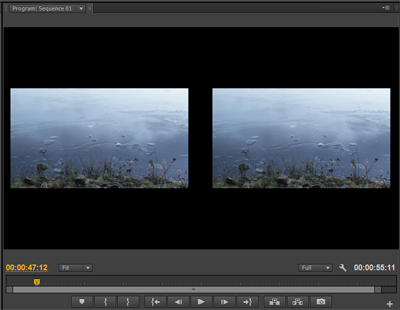
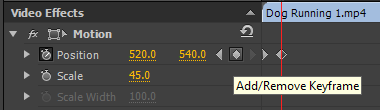
Select the clip on track Video 2 and adjust its Scale to a value of 45. Now play through the clips and they should appear as below. You have created a PIP or “Picture in Picture”
Now let’s change the position of the uppermost clip. With it still selected in the Timeline, adjust the X value to 465. This will move the smaller clip to the left.
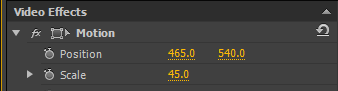
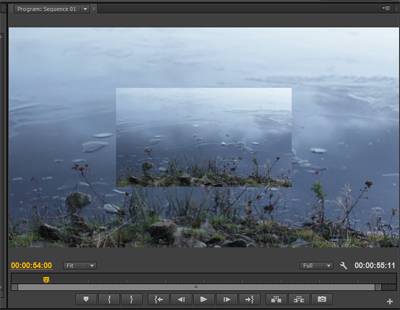
Now select the lower clip on track Video 1. Apply the same Scale value of 45 and enter a X position value of 1446.

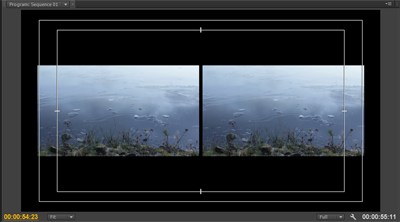
The Program Monitor should now look like this:
You may recognise this style of effect as it is used quite often. Play through it to see how it looks. Drop down the Program Monitor menu in the top right corner and select “Safe Margins“

This will bring up a graphic overlay onto your video in the Program Monitor. This graphic denotes the safe area of the video when preparing for broadcast. Basically, some TV sets do not display all of the image so this graphic ensures that important information is safe within the margins. This graphic will help to provide a reference point so that we can evenly balance our PIP images. Try balancing the images. Remember to select each clip before attempting to move it.
Now that we have doubled the image, we could add other effects to add interest. Alternatively you could of course replace one clip with something different so that two different images are shown at once.
Select the lower clip in the Timeline and type “flip” in the search box within the Effects Panel on the left of the Timeline.
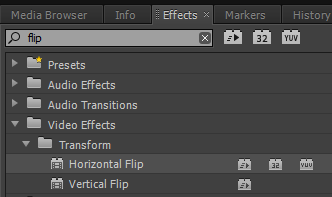
Double-Click the Horizontal Flip effect to apply it to the clip. You will notice it appear in the Effect Controls panel above the Timeline. This effect has flipped the image horizontally so that the action now happens in the opposite direction to the other clip.
Finally we will add some motion keyframing. Select the upper clip and drag the Playhead to the beginning of the clip in the Effect Controls panel. Next, add a Keyframe to the beginning of the clip by clicking the stopwatch icon and turning on Keyframe Animation
Now drag the X position value to the left so that the clip just leaves the viewable frame in the Program Monitor.

Next, drag the Playhead slightly into the clip and add another Keyframe. Without moving the playhead, enter the previous X position of the clip which is a value of 520
Play through the clip and you should see the clip slide in from the left of the screen and stop in it’s edited position.
We now want to apply the same effect to the other clip but in reverse. Make a note of the X and Y position of the lower clip.
With the top clip still selected, right-click it in the Timeline and choose “copy“. Then select the lower clip, right-click and choose “paste attributes“. This will copy the effect settings/motion from the first clip to the second.
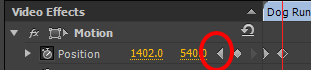
In the Effect Controls panel, click the “Previous Keyframe” button to select the second Keyframe in the clip. Enter the original X position that you noted down which should be around 1402.
Click the “Previous Keyframe” button again to select the first keyframe within the clip. Now, as before, drag the value to the right to take the clip just off the right edge of the viewable frame in the Program Monitor.

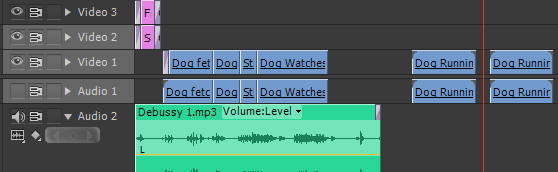
Play the clips in the Timeline to view the finished effect. If you wish you can select both clips and drag them to the end of your edited sequence. Your Timeline may now look like this: