There are many ways to edit video in Adobe Premiere. The way that we like to edit and the way that we think is easiest in terms of learning curve and speed of progression is editing within the Timeline only.
You should already have the “Dog Fetches Stick” video file placed onto track Video 1 on the Timeline. You should be able to see that the video clip is approximately 10 seconds long. Hold your mouse pointer over the end (right edge) of the video clip and you will notice the pointer change to the following symbol.

This is known as the Trim Out tool. Similarly, if you place your mouse over the beginning of the clip, it becomes the Trim In tool. Click and drag the end of the clip so that it is 5 seconds long. Grab the playhead and drag it to the beginning of the sequence. Now press the spacebar and the clip will play through and stop after 5 seconds. Congratulations, you have edited your first video clip.
Now grab the end of the clip and drag it back out as far as you can. Hey presto, the full clip is now restored. This is known as “non-destructive editing” as every action can be undone, or any segment of video cut off may be restored. To undo an action go to Edit/Undo from the main menu.
You will notice that when you extend the video clip to it’s original length, there is a small grey triangle in the top corners, left and right. This means that there is no more video available from the original clip.
Notice also that the audio segment of the video file is synchronised to the video. If you trim one, then the other will be automatically trimmed. This means that the clip is a “Linked Clip“. Later, we may wish to un-link the audio from the video within a file so that they may be edited separately.
Saving your work
It is good practice to save your work as you go along, in case of a computer crash. Premiere provides a useful Auto-Save function which may be set in the Preferences. Go to Edit/Preferences/Auto-Save and tick the box. You may set the frequency of the Auto-Save here too.
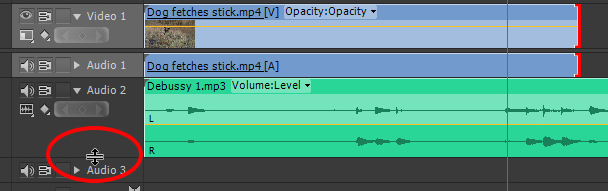
Grab the audio file “Debussy 1” from the Project Panel and drop it onto track “Audio 2” at the beginning of the sequence. Twirl down the triangle in Audio 2 to reveal the sound wave. Move your mouse over the line that separates Audio 2 from Audio 3 in the track controls. Your pointer should change and you may now drag the line down to make the track wider. This will enable you to see and edit the audio waveform more easily.
Play through the sequence and we should now see the video play with it’s original audio, accompanied by the music track.
Adding Stills and Graphics
Stills may be added to the timeline and edited in the same way as video. Drag the file “Sunset 1” from the project panel and drop it onto track Video 2 at the beginning of the sequence. Your sequence should now look like this:
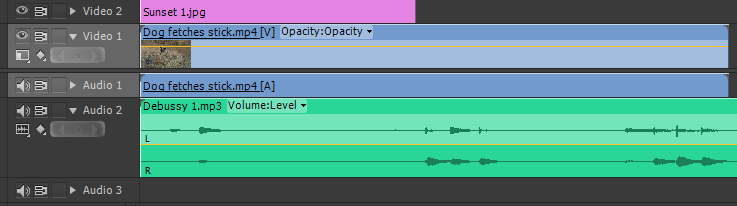
Notice that when you know play the sequence, the first part of the video clip is no longer visible. That is because we have layered the still image over the video at the same point in time within the sequence/timeline. Premiere gives priority to whichever clip or file is on the higher track, regardless of the number of tracks in a sequence.
The length of a particular still placed on the Timeline may be edited to your preference in the same way as video and audio. Simply grab the edge of the file within the timeline to shorten or lengthen it.
Let’s start our edit with the sunset and the music playing underneath. Click in the middle of the video file and drag it to the right so that it starts after the still picture has finished.

You will see that the file will “snap” to the end of the still image and a vertical black line will appear. This is because the “Snap” function is enabled. This can be seen in the image above. Try turning the snap off and moving the file again. Most of the time, it is helpful to leave the function turned on.
Now zoom out by pressing the “-” key on your keyboard or adjusting the edge of the scroll bar. Stop once the entire music file fills the timeline. Now let’s drag the right edge of the music file somewhere near the end of the video file to tidy things up.
Zoom back in so that the majority of the editing “action” fills the timeline. The Zoom function will operate around the Playhead, so ensure that it is always in the correct position for the centre of where you would like to zoom. A good start is to place the playhead at the beginning of the timeline. Your timeline should now look like this:

Play your sequence through. We are going to use the sunset image as a background for the title of our video. We can see and hear that at the moment everything happens rather abruptly. The images start and end abruptly and the audio ends abruptly. Our production will appear far more professional if we attend to these issues which we will do in the next lesson.
First of all let’s turn off the original audio from the DSLR video file. Generally, audio recorded with the internal microphone of a DSLR leaves a lot to be desired and as we are going to set this piece to music, we don’t really need it.
Click the small speaker icon to the left of track Audio 2. This will turn off the output from that particular track.
Ok, we have our first edit in place and you should now be comfortable with dragging assets from the project panel to the timeline, positioning and altering their length, and using layers/multiple tracks.